
Living in such humid country, then corrosion is always around. I hate it, frankly speaking. But no choice 😉
I try to ignore such corrosion (and throw away my ‘perfectionist’ habit), but when it comes to my DACT Stepped Attenuator, then I can’t resist of cleaning it. Why? Because when the DACT got this issue, it will create some clicking or popping noise during changing the volume. This is very-very not convenient.
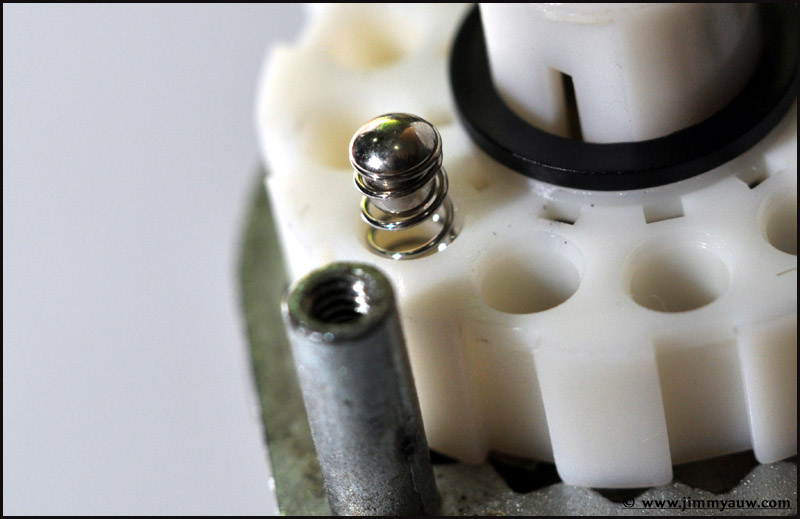
I plan to pot this DACT sometime later, but probably not now. So today, I’m going to clean this DACT again (for 2nd time in last two years) and do some modification. Here we go! Below is the parts of DACT Stepped Attenuator after I disassemble it.

When I’m working with metal and about to clean them, Brasso metal polish is my good friend!

Some Brasso and cotton bud could be very handy here. Rub the corroded surface to clean them up.

Cleaned surface. Hard to make them 100% back to the original, but this one should be enough to remove all those cracking/popping noise during changing the volume.

This CRC Electronic Cleaner also become very handy to quickly clean the surface after we are done with the Brasso.

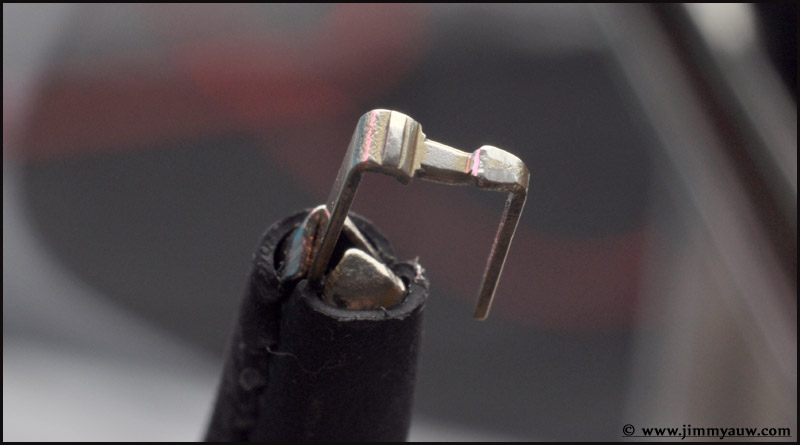
Another part that we have to clean is the ‘Bridge’. The Bridge is ‘U’ shape metal which will connect each step of the attenuator to the Output. If you know the logic of series Stepped Attenuator, the output will rotate to different step based on the design (from step 1 to maximum step based on the switch capability). In this case, this DACT has 24 steps. So, the Bridge will rotate and connect the center trace on the PCB (red arrow) to each hole surrounding it (green arrow). Each hole will represent step’s number.
A dirty Bridge also will create cracking/popping noise during changing the volume.

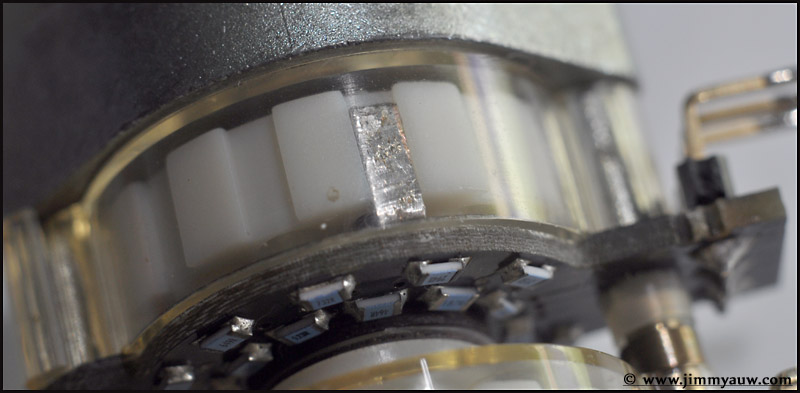
On the back of the PCB, we can see SMD resistor connected to each hole. So by rotating the main shaft, the Bridge will move and connect to specific resistors chain and produce necessary attenuation.

The Bridge itself will be supported by a ‘Spring’ and ‘Bullet’. Both will work together and produce enough pressure to make sure the Bridge will connect the main center ring to the correct hole which represents the step of the attenuation.
The first idea is to ‘laminate’ the Bridge with something that is more resistant to corrosion. What is that? My answer at present time is: Tin solder. As the Tin will laminate the Bridge and the Bridge itself is very important to select and connect the needed attenuation (simple words: this Bridge is inside the signal chain), then it has to be laminated with something that sounds good. If it’s a Tin solder, then it has to be the one with good quality (remember, it will be inside the signal chain). So I pick my standard Tin solder: WBT Silver Solder.
The Bridge is now laminated with WBT Silver Solder. It’s not gonna be easy to laminate this. You might need to use Rosin to ‘cook’ the Tin solder well and maybe some Thinner or Sand Paper to clean the surface.
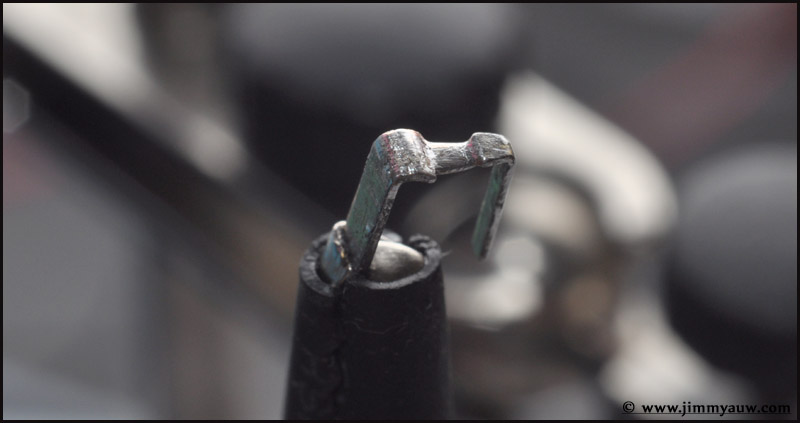
Assembly all of them back. Now we can see the Bridge laminated with WBT Silver Solder. Not the best approach, but this should longer my routine process to clean it. It’s even better if I can laminate the PCB (the center ring and the holes around), but surely it will take even longer time to accomplish 😉
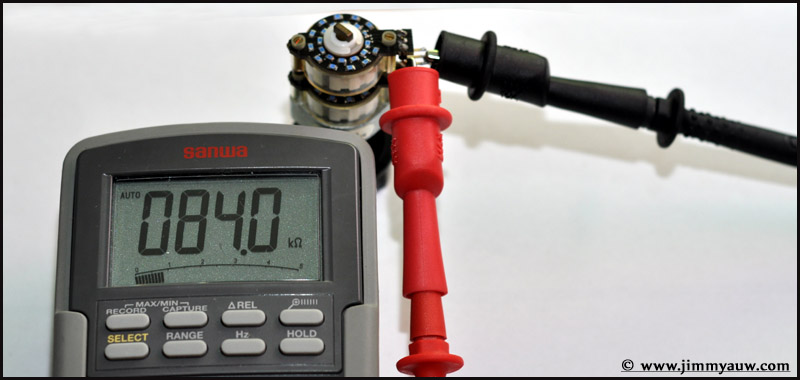
Final check. I move the shaft into some step, and check the channel balance. Here is showing the first channel (bottom gang) at 84 kOhm.

Here is the second channel (top gang) showing the same value, 84 kOhm. No surprise as this is high precision SMD resistor. We can’t expect anything but precision.
So, I think I’m ready to rumble? The sound? Better for sure, as no more cracking and popping sound when I adjust the volume. And I think putting WBT Silver Solder to laminate also improves the sound (better imaging/staging). DACT and similar stepped attenuator is definitely better than common potentiometer in terms of detail and imaging, but I think putting WBT Silver Solder in the Bridge brings extra improvement on this area. Well, it’s a bonus anyway. The main idea is freedom of cracking and popping noise. That’s the goal of this cleaning process 🙂


Agus
June 11, 2013 10:47Siang Ko,
Walah, kok gold plated masih bisa karatan yah?
BTW nice Attenuator…
Salam 🙂
Auw Jimmy
June 11, 2013 11:58Hi Bro,
Kalo ga dipake alias ga ada gesekan sih ga akan karat ya?
Ga sebagus TVC koq 🙂
Thanks.
Agus
June 11, 2013 12:56wkwkwk. Saya pikir kalo gold atau silver plated harusnya rust free.
hmm.. masih bingung kok sering dipake bisa karatan? drmna dtgnya?
So far so good kalo rotary switch ku. Ga tau nantinya bisa karatan ga hehehe
Salam 🙂
Auw Jimmy
June 11, 2013 13:05Wah saya belum sempet nanya datang dari mana sih, Bro 😉 Uda keburu saya ‘usir’. Kalo mau super aman, cari yg military grade dan sealed design.
Thanks.
Anonymous
June 13, 2013 08:25Halo bro..
Boleh tanyak itu crc sama brasso beli dimana di indonesia? Ane di surabaya nih.
Thanks..
Auw Jimmy
June 13, 2013 08:34Halo bro,
Brasso sih di toko bangunan banyak. Kalo CRC mesti ke toko yg agak besar macam Ace.
Thanks.
Rajiam
June 13, 2013 09:39Hi Jimmy,
After seeing all those modes I think you are the person who can help me out. Could you tell me weather TDA7265 amps can be used for 2 speakers output. I have an ALtec lansing asc56 4.1 system. the fronts speakers are acs56 but the rears are of 54 model. I need to increase the output of the amp so that the rear speakers can produce more sound. The data sheet will be available if you do Google.
Thanks a lot.
Auw Jimmy
June 13, 2013 10:10Hi Rajiam,
Yes, TDA7265 can be used for 2 speakers output.
Thanks.
Rajiam
June 13, 2013 12:18Hello Jimmy
I never expected an answer so soon, I must say Thanks, Thanks, Thanks. I should have asked the question clearly (I have it inside but I should express it properly).
I actually should have asked whether I will get output from 2 speakers using 1 amp.
And if it is possible for you would you tell me how to do that? you can have a look inside the sub woofer through the link below.
http://translate.google.com/translate?hl=en&sl=zh-TW&u=http://www.dearhoney.idv.tw/Speakers/ACS56/&prev=/search%3Fq%3Dhttp://www.dearhoney.idv.tw/Speakers/ACS56%26biw%3D1920%26bih%3D958.
Thanks again
Auw Jimmy
June 13, 2013 12:32Hi,
If you mean to put two speakers in one amp output then I would not suggest that.
Thanks.
Rajiam
June 13, 2013 12:48Ok man
Thanks a lot for answering
Regards
Rajiam
Auw Jimmy
June 13, 2013 14:29Welcome.